OUR JAR PROJECT!
(& directions for you too!)
For my wedding (which has a rustic theme)-we are using a lot of Mason jars for decorations and props-because they are easy to dress up, lovable, and just have a rustic feel! My mamaw said she would give me a bunch-so-today, we decided to play around with designs and stuff-and worked on about 8 of them or so. We went to Walmart and bought about $25 worth of supplies-then we went to the vendors mall and got a few little things we could use as well!
So for this project, we needed:
- acrylic matte paint (these were 57 cents @ Walmart, I bought 3 vanilla colors, 4 purple, and 4 teal-totaling to about $7)
- sponge paint brushes (These were 97 cents, I bought 2 packs)
- jars (I didn't have to buy these-but you can buy 6 for $9 @ Walmart)
- glue gun (optional)
- paper plates (to put the paint on)
- a cup of water (to rinse the brushes)
- matte finish spray paint (this was $4, you don't need this-but it is advised because the paint can chip)
- sand paper (or blocks. I used both. I bought 2 different types of grained sanding blocks-which need to be fine-but not too fine, look for the kind that is between 320 & 400. (again, this is optional-but best if you want them to look aged or rustic.))
- newspaper (also optional-but prevents a huge mess!)
Here's what we did:
- First lay out all the newspapers-this will be the area you will work in. Be sure to wear clothes you don't mind to get paint on also! Get everything opened, get your cup of water for your brushes, get your paper plates, pick a jar-and make sure it is clean and has no debris in or on it.

- Poor your paint onto the paper plate and get your paintbrush damp. (I painted my jars with the lid side down-but you don't have to-I just found it easiest. Also-I didn't paint the part of the jar where the lid would screw on-again, this is optional.) I started off by painting the area under the lid section first-ya know-the indented part? You don't have to-but it looks better when it dries.
First painted jar-1 coat
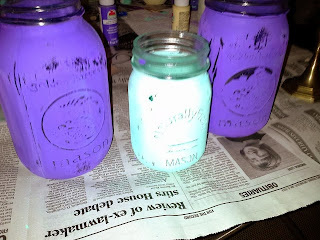
1st, 2nd, & 3rd painted jars-all with single coats. The little teal jar on the far right-has paint on the inside of the jar unlike the others which have paint only externally.
4. When you are finished applying the first coat-let the jars sit to dry. This should take an hour-give or take. To speed up our process-we had the luxury of sitting them in front of a gas fireplace!
5. Even though sitting them close to the fire sped up the process an extra 20 minutes, we let them sit for a whole hour just to make sure the paint was completely dry -THIS IS EXTREMELY IMPORTANT-DO NOT PAINT THE 2ND COAT ON THE JARS UNTIL THE PAINT IS 100% DRY OR THE JAR PROJECT WILL BE RUINED-the paint will chip, run, bundle up-and look super ugly.
6.After the jars are 100% dry-you can then paint the 2nd coat. Again-be sure to go in straight, diagonal strokes. (basically repeat step #3).
Jars with 2nd coat (3rd coat if necessary)
7. Finally my favorite step! When the jars are 100% dry-you can begin sanding them! If they aren't dry-this will ruin the project.-the paint will ball up, peel, and chip off. Anyway-don't go crazy with the sand paper/or sanding block-you are basically just distressing the painted jar.
8. To successfully distress a painted jar-you will apply different pressure to the jar in areas where it would look worn like the corners, edges, or any raised areas, like the following jars.
To achieve the look of the little jar-I painted the inside of the jar a teal color and applied 2 thin coats of purple on the outside of the jar. Then-when I used the sanding block on the jar-the teal color showed through nicely.
9. Lastly-and maybe most important-apply the matte spray paint to the jars! (If you are going to put candles inside the jars, or may be placing this jar near fire or in extreme heat-DO NOT use a spray paint seal-or else-this will turn into a pretty little bomb.) I used these for decorations-so I was able to proceed with this step. This step will prevent the paint from fading, pealing, or chipping.
BONUS! :
To make a really cool looking jar- you can do this.
1. Before applying any paint-heat up your glue gun-and use the glue to write a word on the jar. Like so:
2. Now-you can go ahead and proceed with the steps above. When you are finished it will look like this:
Cute eh? Note: This color was actually achieved by accident. I dipped my sponge paint brush into the vanilla cream colored paint-which had accidentally ran into the teal paint-when I done the paint stroke-it came out like this....and I liked it!....so much in fact-I painted another jar like this on purpose adding hints of purple and teal! LOOK:
Can't decide if I will sand these or not-I like the look.
Now these aren't my only jar projects-I plan on doing many more like this! You like? I love!
Here are a few more pictures throughout the process!:


No comments:
Post a Comment