Thursday, January 16, 2014

Premarital Counseling Session 1

For our wedding, Gage & I had originally planned to have my papaw marry us as he is a preacher and is able to do so. I thought it was a good idea-he was cool with it, however-it didn't feel right. 
Typically, in a wedding, the bride's father give her away-
well...that's not really what I wanted. 
My dad and I are on good terms-but he doesn't really have much to do with me. 
To me-my dad is like my mailman. We see each other, we have small talk if the need arises-but...
what bride wants their mailman to give her away at her wedding? 
#awkward
If I have ever considered anyone to be a father figure-it would be my papaw.
So-I wanted him to give me away.
& he will. 
With that decision made-it left us preacherless for our wedding.
I mean, my papaw could give me away and be my preacher but it would be weird. Like: 
Papaw: "Who gives Kiersten away? *turns around* I do. *turns back around*"
Gage & I both go to the same church-which we are happy with and comfortable with our preacher-why not have him marry us? 
So we ask him! & he said yes.
BUT: we didn't really 'read the fineprint' (aka: we didn't know what we were getting into)
in which after he confirmed he would marry us-he also informed us that he required 8 weeks of 
premarital counseling. 
Neither of us had ever been through counseling and didn't know what to expect. 
At first I thought, 'he's going to try to change our mind and decision to marry so young...'
& Gage even said, "so-he's going to play with our mind?"
which-we were both wrong. 
We went to our first session of counseling
We didn't so much as Drew (our preacher) was basically giving us an idea (or warning) of what to expect.
We would be meeting maybe twice a month-give or take, and had to complete and online 'inventory'/ questionnaire about our self and our spouse before our next session
-but-we couldn't share answers or discuss the questions with eachother.
-It was harder than I thought.
Some of the questions were intense, made me blush, made me emotional, and made me think. 
I'm unsure of what the future sessions hold-
but in my heart-I know this is the right thing to do.


Monday, January 13, 2014

Working on our jars!

OUR JAR PROJECT! 
(& directions for you too!)

For my wedding (which has a rustic theme)-we are using a lot of Mason jars for decorations and props-because they are easy to dress up, lovable, and just have a rustic feel! My mamaw said she would give me a bunch-so-today, we decided to play around with designs and stuff-and worked on about 8 of them or so. We went to Walmart and bought about $25 worth of supplies-then we went to the vendors mall and got a few little things we could use as well! 

So for this project, we needed:

  • acrylic matte paint (these were 57 cents @ Walmart, I bought 3 vanilla colors, 4 purple, and 4 teal-totaling to about $7)
  • sponge paint brushes (These were 97 cents, I bought 2 packs)
  • jars (I didn't have to buy these-but you can buy 6 for $9 @ Walmart)
  • glue gun (optional)
  • paper plates (to put the paint on)
  • a cup of water (to rinse the brushes)
  • matte finish spray paint (this was $4, you don't need this-but it is advised because the paint can chip)
  • sand paper (or blocks. I used both. I bought 2 different types of grained sanding blocks-which need to be fine-but not too fine, look for the kind that is between 320 & 400. (again, this is optional-but best if you want them to look aged or rustic.))
  • newspaper (also optional-but prevents a huge mess!)


Here's what we did:


  1. First lay out all the newspapers-this will be the area you will work in. Be sure to wear clothes you don't mind to get paint on also! Get everything opened, get your cup of water for your brushes, get your paper plates, pick a jar-and make sure it is clean and has no debris in or on it. 
  2. Poor your paint onto the paper plate and get your paintbrush damp. (I painted my jars with the lid side down-but you don't have to-I just found it easiest. Also-I didn't paint the part of the jar where the lid would screw on-again, this is optional.) I started off by painting the area under the lid section first-ya know-the indented part? You don't have to-but it looks better when it dries.
3. Be sure to make even and smooth paint strokes from top to bottom-try not to overlap paint because the paint will chip. (If you see an area that isn't as smooth as others-don't try to correct it right then-wait until it dries completely and then correct it on the 2nd coat of paint.)
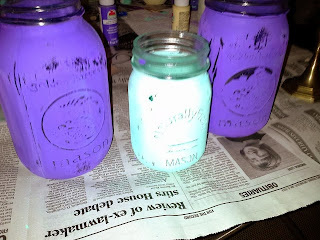
 First painted jar-1 coat
1st, 2nd, & 3rd painted jars-all with single coats. The little teal jar on the far right-has paint on the inside of the jar unlike the others which have paint only externally.
4. When you are finished applying the first coat-let the jars sit to dry. This should take an hour-give or take. To speed up our process-we had the luxury of sitting them in front of a gas fireplace! 

5. Even though sitting them close to the fire sped up the process an extra 20 minutes, we let them sit for a whole hour just to make sure the paint was completely dry -THIS IS EXTREMELY IMPORTANT-DO NOT PAINT THE 2ND COAT ON THE JARS UNTIL THE PAINT IS 100% DRY OR THE JAR PROJECT WILL BE RUINED-the paint will chip, run, bundle up-and look super ugly. 

6.After the jars are  100% dry-you can then paint the 2nd coat. Again-be sure to go in straight, diagonal strokes. (basically repeat step #3).

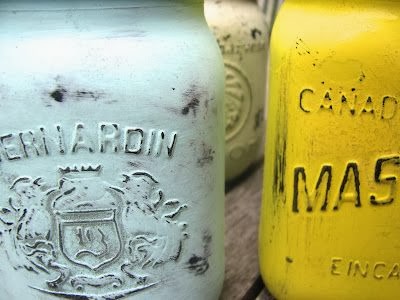
Jars with 2nd coat (3rd coat if necessary)

7. Finally my favorite step! When the jars are  100% dry-you can begin sanding them! If they aren't dry-this will ruin the project.-the paint will ball up, peel, and chip off. Anyway-don't go crazy with the sand paper/or sanding block-you are basically just distressing the painted jar. 

8. To successfully distress a painted jar-you will apply different pressure to the jar in areas where it would look worn like the corners, edges, or any raised areas, like the following jars. 


To achieve the look of the little jar-I painted the inside of the jar a teal color and applied 2 thin coats of purple on the outside of the jar. Then-when I used the sanding block on the jar-the teal color showed through nicely.

9. Lastly-and maybe most important-apply the matte spray paint to the jars! (If you are going to put candles inside the jars, or may be placing this jar near fire or in extreme heat-DO NOT use a spray paint seal-or else-this will turn into a pretty little bomb.) I used these for decorations-so I was able to proceed with this step. This step will prevent the paint from fading, pealing, or chipping. 

BONUS! :
To make a really cool looking jar- you can do this. 

1. Before applying any paint-heat up your glue gun-and use the glue to write a word on the jar. Like so:
2. Now-you can go ahead and proceed with the steps above. When you are finished it will look like this:
Cute eh? Note: This color was actually achieved by accident. I dipped my sponge paint brush into the vanilla cream colored paint-which had accidentally ran into the teal paint-when I done the paint stroke-it came out like this....and I liked it!....so much in fact-I painted another jar like this on purpose adding hints of purple and teal! LOOK:


Can't decide if I will sand these or not-I like the look. 

Now these aren't my only jar projects-I plan on doing many more like this! You like? I love!
Here are a few more pictures throughout the process!: 


Thursday, January 9, 2014

I FOUND SOME DOORS FOR MY ARCH!

Wait...What? Doors?
Yessss.
I wanted some doors for my indoor wedding arch.
Remember my inspiration? >
Wellll-I found some!
But it wasn't easy. See, I posted an add on Facebook saying: "If anyone has some old doors or mason jars-let me know!" -of course...I had not responses for the doors and my manager even said: "Kiersten, quit asking for weird stuff on Facebook. It's weird." So I started calling antique shops in which one antique shop had some old doors for $30-$50 a piece. -NOT in my price range.
I was on the verge of taking my double closet doors-or just taking the front doors off of random houses. 
THEN-my mom, stepdad, siblings and I went to Lexington and visited the Resale Store for Habitat for Humanity.
They had doors for $5-$45.
My mamaw and papaw happened to be around too-so they stopped by. 
Instead of getting doors-
we found a single set of white bifold shutters and a single set of bifold doors.  

Not sure if you can tell from the picture-but one side of the doors are white-the other is a mint green....which happens to be one of my wedding colors!! 

These just scream "RUSTIC" and are just adorable. 
OH-& I paid $39 for everything. They had been $45 a piece-but I got a deal and paid $39 total. 

Now-these weren't my first choices-but my papaw had this idea-and I fell in love with it. 
He's going to take the hinges off the bifolds and make them into 2 individual doors and 2 individual shutters. THEN- He is going to attach one of the onto the one of the doors (the shutters being on the outter side) and then adding an arch connecting everything together. 
From that-I will hang some jars that I will paint and decorate. 

It's hard to explain & visualize-but it will come together nicely! 
I'll post pictures of the progress! 
CAN'T WAIT!


How "Rustic" became my theme.

So as stated before, my original wedding theme was going to be paper airplanes & paper hearts?
Why? No-we aren't Chinese. Actually-in highschool, Gage and I had no classes together-so we wrote notes. Folding them into squares became boring-so Gage started writing me letters and making them into origami hearts and paper planes. Cute idea right? 
Well-I didn't want to explain the story to everyone-and it would actually be very difficult to do-so-somehow our theme became more RUSTIC.

I really can't tell you how that came about-but I think Pinterest has something to do with it. 
The church we are getting married in is very small-but it holds meaning.
It's where I grew up and the first church Gage ever went to. 
When I say 'small' I mean-maximum capacity: 80 people
It already has a rustic feel to it-so I guess it flows. 

Anyway-looking on Pinterest: I seen a lot of great ideas for Rustic wedding themes-& let me tell you
if you are wedding planning on a budget-RUSTIC IS THE WAY TO GO! 
For this theme: I mainly needed burlap, mason jars, and (oddly enough) some old doors! 
Here's why: 

Now-I'm not getting married outdoors-but there is a big empty space and we needed a wedding arch-for some reason-this one called me! I posted on Facebook looking for old doors-but had no luck-will keep you updated. old doors are harder to find than you would think!

Mason Jars? YES! These have rustic written alllllll over them! These are easy to paint and distress and fun-and reusable-and the list goes on! You can buy like 9 of them for $6 at Walmart-but luckily-I just called my mamaw, ask for some mason jars and she said, "how many do you need?" and I said "Eh...30?" She said: "Well come up here tomorrow and you can have 30 mason jars." She used them for canning and had PLENTY left over. They were all different shapes, sizes, and designs which added to the rustic theme! Can't wait to start on these! 

This is my wedding aisle runner inspiration. You can buy this for almost $200 on Etsy-but I'm really going to try to make it myself. (I don't know what I'm getting myself into). Anyway-Burlap just has a rustic look to it anyway-and it's relatively cheap and you can do SO MUCH with it! I mean really! 

So there ya go! -Those 3 pictures are how all of this will come together. We will see how this goes. I will post new blogs on my progress. My wedding is so special-and it will mean so much more because my future husband, my family, his family, and I have put so much work into it and done all of it by ourselves! 
PRAYERS APPRECIATED!


Wedding Planning meets Procrastination

With the New Year comes new blessings! 
When I was 17-I would never have thought I would be thinking wedding plans-
ESPECIALLY making them for myself. 
This whole wedding planning thing-it's no piece of cake. 
Not at all. 
It's hard work man. 
Have you seen that whole wedding checklist thing on Pinterest? 
If you haven't, this is it:
Originally, I was planning it 12 months in advance because Gage proposed to me on May 28th, 2013.

My gorge ring<3

 Which was just before our 4 year anniversary on May 31st. Therefore, we decided we would get married on our 5 year anniversary: May 31st, 2014. Giving me 12 months to plan-plenty of time right? Well....being a college student-I am a procrastinator at my finest! 
There's a paper due at 8am? I'll start it at 5am!
Procrastination is a curse-but I have never...EVER failed a paper. Not once. 
So-it takes skill.
But certainly not when it comes to wedding planning. 
See-I thought, "Oh-my wedding is 12 months away? I don't have to worry about it today...or tomorrow-or the next day...or the day after that....etc.etc.etc." So I kept putting it off-until it came December and it occurred to me that I was getting married in 5 months. 
Now-5 months seems like plenty of time-
BUT NOT WHEN YOU'RE PLANNING A WEDDING!
I mean-I haven't even booked a photographer-and some of those guys book like a year in advance-
& I'm giving people a 5 month notice? 
HOLY CRAP! 
So I got on the ball-and let me tell you: I got stuff DONE! 
I ordered Save The Dates & designed wedding invitations all in one night.

my Save The Dates, ordered these from Vista Print-highly recommended.
Also came with matching envelopes and stickers!

Originally, my wedding theme was paper airplanes, and paper hearts...but now it's a Rustic Themed Wedding. Ya know-with mason jars and burlap and distressed stuff. 
-Rustic is the best way to go if you are on a budget-I'll discuss this in my next blog though.
Anyway-It's January and things are falling into place! 

HAPPY PLANNING! 


Monday, January 6, 2014

Young Marriage-and the reputation it holds.

I have been dating my-what is now my fiance for four years and we have been engaged for 8 months. Sounds good right? We know each other like the back of our hand, my family loves him, his family loves me, we have a dog, we don't live together, we are getting married in May, and everything seems to be falling into place right? Well-not exactly. See, we are young. I'm 19 & he is 20. Not everyone was really congratulating us on our engagement and our age is mostly to blame. I mean, we did get some congratulations-but amongst those were:

1.) "You guys won't last a year." 
2.) "They aren't even thinking!"
3.) "I wish you guys would wait!"
4.) "The divorce rate for young couples is soaring!"
5.) "What if Gage has to go to medical school? What will you do?"
6.) "Why can't you wait til you graduate?"
7.) "You're just being rebellious!" 

The list goes on-and to these, I replied: 

1.) Hopefully...we won't last a year. We plan to last much more. (;
2.) We aren't thinking? Look: this took a lot of thought. Really. We thought about our income, home, future....etc. Now, premarital sex, teenage pregnancy, drug use, and drinking coffee before bed is thoughtless. 
3.) Why wait? If we know we want to get married and spend our lives together-why wait? 
4.) Indeed it is! But we won't be a statistic. 
5.) Gage wants to further his career? What ever will I do? Surely, I must leave him for doing such a thing! How dare he try to do what's best! Seriously, I will stick with him and support him in whatever he wants to do. If it requires moving-so be it! 
6.) We did wait! We graduated highschool! Haha, okay, now I'm being a smarty pants. Again, why wait?
7.) Rebellious? Getting a tattoo or an odd piercing-now that's rebellious...and I have neither. I have been bungee jumping and did eat a whole pack of strawberries without my mothers consent once though.